

Below is the expanded article body.

Image: DRS Web (image: eLearnCourses)
PHP is not dying – it quietly runs the majority of the internet, and that is precisely why learning it properly, rather than copy-pasting from a decade-old forum thread, is worth your time. By the end of this guide, you will have a working local PHP environment, a complete database schema, a connection file you can reuse across scripts, and a form handler that validates input, escapes output, and runs parameterised queries – the combination that closes off the most common way attackers get at your data. This isn’t a syntax dump. It’s a PHP PDO tutorial built around one outcome – shipping code that works and holds up under real-world misuse.
Prerequisites
Image: DRS Web (image: eLearnCourses)
You need three things before starting: a computer running Windows, macOS, or Linux; basic HTML knowledge, specifically how <form> and <input> tags work; and about an hour of uninterrupted time. You do not need prior programming experience, though it helps.
Install these two tools now:
- XAMPP – a free bundle that packages Apache (web server), MySQL/MariaDB (database), PHP, and Perl into one installer. It’s the fastest way to get a local PHP environment running without configuring each piece separately.
- VS Code – a free code editor with excellent PHP extensions.
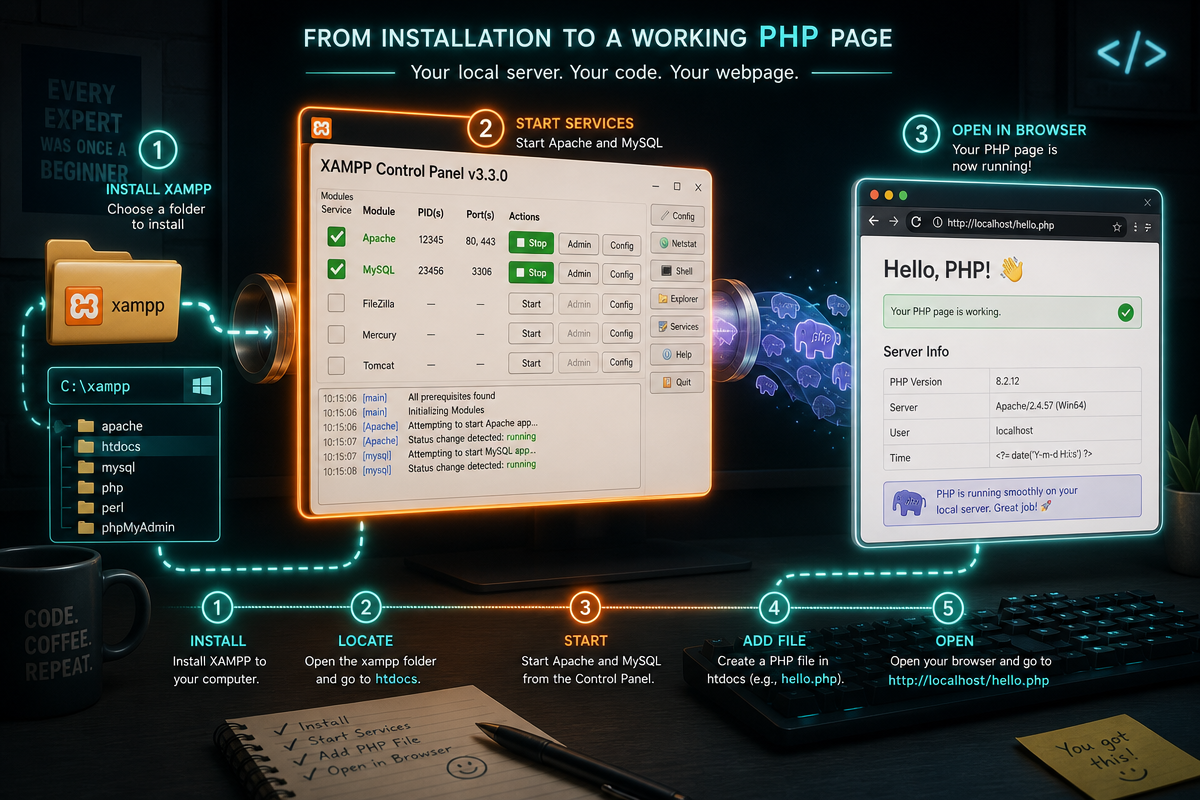
Download XAMPP from apachefriends.org and run the installer with default settings. Once installed, you’ll have everything you need to serve PHP files locally.
Step 1: Start your local server and confirm PHP works
Open the XAMPP Control Panel and click “Start” next to both Apache and MySQL. Both status indicators should turn green within a few seconds.
Here’s the part beginners get wrong most often: you cannot open a PHP file by double-clicking it. PHP is a server-side scripting language, meaning the code runs on the web server – not in your browser – and the server generates HTML before sending it to you. If you open a .php file directly using file://, your browser has no idea what to do with the PHP code and either shows you the raw text or nothing at all.
Create a file called hello.php inside XAMPP’s htdocs folder (usually C:\xampp\htdocs on Windows or /Applications/XAMPP/htdocs on macOS) with this content:
<?php
echo "PHP is running.";
Now visit http://localhost/hello.php in your browser – not the file path, the local URL. You should see “PHP is running.” on a blank page.
Common mistake: if you see the raw PHP code printed on screen instead of the output, you’ve opened the file directly rather than through Apache. Check your address bar – it must start with http://localhost/, not file:///C:/....
Step 2: Learn PHP’s core syntax
PHP’s foundational syntax covers three things: variables, conditionals, and loops – and you’ll use all three in nearly every script you write. PHP variables start with a $ sign and don’t require you to declare a type up front, which makes them faster to write than in strictly-typed languages, though it also means you need to be more careful about what you’re comparing.
<?php
$name = "Alex";
$age = 29;

if ($age >= 18) {
    echo "$name is an adult.";
} else {
    echo "$name is a minor.";
}

$fruits = ["apple", "banana", "cherry"];
foreach ($fruits as $fruit) {
    echo "I like $fruit. ";
}
Save this as basics.php in htdocs and load it at http://localhost/basics.php. You should see: “Alex is an adult. I like apple. I like banana. I like cherry.”
Note the double quotes around "$name is an adult." – PHP interpolates variables inside double-quoted strings but not single-quoted ones. That distinction trips up beginners constantly, so get comfortable with it now rather than debugging it later.
Step 3: Understand what modern PHP actually looks like
If your mental model of PHP comes from a tutorial written before 2020, it’s outdated. PHP 8.x releases have substantially modernised the language: union types, named arguments, enums, fibers for async-style code, and a JIT compiler have all landed since PHP 8.0. This matters because plenty of blog posts and Stack Overflow answers still teach PHP 5-era patterns that are either deprecated or simply worse than the modern equivalent.
Here’s a quick before/after showing named arguments, one of the more useful PHP 8 additions:
// Before (PHP 5-7 style - error-prone with many parameters)
function createUser($name, $email, $age, $isAdmin) { /* ... */ }
createUser("Alex", "alex@example.com", 29, false);

// After (PHP 8+ - explicit and order-independent)
function createUser(string $name, string $email, int $age, bool $isAdmin = false) { /* ... */ }
createUser(name: "Alex", email: "alex@example.com", age: 29);
The “after” version is self-documenting at the call site – you can see exactly which value maps to which parameter without checking the function definition. This same modernisation push underpins frameworks like Laravel, which builds directly on PHP 8 syntax.
Step 4: Create the database schema and a reusable connection file
Before writing any PHP that touches a database, define the schema in SQL so it’s version-controlled and reproducible. Open http://localhost/phpmyadmin, click the “SQL” tab against a new database, and run this:
CREATE DATABASE IF NOT EXISTS test_app CHARACTER SET utf8mb4 COLLATE utf8mb4_unicode_ci;
USE test_app;

CREATE TABLE IF NOT EXISTS users (
    id INT UNSIGNED AUTO_INCREMENT PRIMARY KEY,
    name VARCHAR(100) NOT NULL,
    email VARCHAR(255) NOT NULL UNIQUE,
    created_at TIMESTAMP DEFAULT CURRENT_TIMESTAMP
);
The UNIQUE constraint on email stops duplicate sign-ups at the database level, not just in your PHP validation – a second line of defence if the application layer ever gets bypassed.
Now create config.php in htdocs. Keep credentials here so every script can require them instead of retyping connection details:
<?php
// config.php - local dev credentials. In production, load these from
// environment variables instead of committing them to a file.
$host = "localhost";
$db   = "test_app";
$user = "root";
$pass = "";
Then create connect.php, which builds the actual PDO connection:
<?php
require __DIR__ . '/config.php';

try {
    $pdo = new PDO("mysql:host=$host;dbname=$db;charset=utf8mb4", $user, $pass);
    $pdo->setAttribute(PDO::ATTR_ERRMODE, PDO::ERRMODE_EXCEPTION);
    $pdo->setAttribute(PDO::ATTR_DEFAULT_FETCH_MODE, PDO::FETCH_ASSOC);
} catch (PDOException $e) {
    error_log($e->getMessage());
    http_response_code(500);
    exit('Could not connect to the database. Please try again later.');
}
Load http://localhost/connect.php directly – you should see a blank page (no output means no error). XAMPP’s default MySQL setup uses username root with an empty password, which is fine for local development but must never ship to a production server. On a live server, read $user, $pass, and $db from environment variables rather than a plain-text file, and make sure config.php sits outside the web-accessible document root or is blocked by your server config.
Common mistake: forgetting setAttribute(PDO::ATTR_ERRMODE, PDO::ERRMODE_EXCEPTION). Without it, PDO fails silently on bad queries instead of throwing a catchable error, which makes debugging far harder than it needs to be. Notice also that the catch block above logs the real error with error_log() but shows the visitor a generic message – printing raw database errors to the page (as the earlier “Connected successfully” example did) leaks your table names and query structure to anyone who breaks the connection on purpose.
Step 5: Run parameterised queries to prevent SQL injection
Parameterised queries separate your SQL structure from user-supplied data, so a value submitted through a form field can never be interpreted as part of the SQL command itself. This is the single most important habit in this entire guide – more important than any syntax you’ve learned so far. It’s worth being precise about what it does and doesn’t cover: parameterised queries close off SQL injection specifically, they are not a general security guarantee, and you still need the validation, output escaping, and CSRF protection covered in the next step to handle the rest of a form’s attack surface.
Here’s the vulnerable version first, so you can see exactly what to avoid:
// NEVER DO THIS - vulnerable to SQL injection
$name = $_POST['name'];
$sql = "SELECT * FROM users WHERE name = '$name'";
$result = $pdo->query($sql);
If someone submits ' OR '1'='1 as the name, that query returns every row in the table. Here’s the safe version using PDO’s prepared statements:
$stmt = $pdo->prepare("SELECT * FROM users WHERE name = :name");
$stmt->execute(['name' => $_POST['name']]);
$results = $stmt->fetchAll();

foreach ($results as $row) {
    echo htmlspecialchars($row['name']) . " - " . htmlspecialchars($row['email']) . "<br>";
}
The :name placeholder tells PDO to treat whatever comes through $_POST['name'] strictly as data, never as executable SQL. That’s the core trick. The htmlspecialchars() calls around the output are a separate, equally necessary habit: they stop stored data – a name like <script>alert(1)</script> typed into the form earlier – from being rendered as live HTML when you print it back out. SQL injection and cross-site scripting are different vulnerabilities with different fixes, and PDO alone only handles the first one.
Step 6: Handle a real HTML form submission with validation and CSRF protection
A form is only as safe as the PHP behind it, and this is where the schema from Step 4, the connection from Step 4, and the parameterised query from Step 5 all come together – plus two things no beginner tutorial should skip: server-side validation and a CSRF token. Create form.php:
<?php
require __DIR__ . '/connect.php';

session_start();
if (empty($_SESSION['csrf_token'])) {
    $_SESSION['csrf_token'] = bin2hex(random_bytes(32));
}

$errors = [];
$success = false;

if ($_SERVER['REQUEST_METHOD'] === 'POST') {
    if (!hash_equals($_SESSION['csrf_token'], $_POST['csrf_token'] ?? '')) {
        $errors[] = 'Invalid form submission. Please reload the page and try again.';
    }

    $name = trim($_POST['name'] ?? '');
    $email = trim($_POST['email'] ?? '');

    if ($name === '' || strlen($name) > 100) {
        $errors[] = 'Name is required and must be under 100 characters.';
    }
    if (!filter_var($email, FILTER_VALIDATE_EMAIL)) {
        $errors[] = 'Please enter a valid email address.';
    }

    if (empty($errors)) {
        try {
            $stmt = $pdo->prepare("INSERT INTO users (name, email) VALUES (:name, :email)");
            $stmt->execute(['name' => $name, 'email' => $email]);
            $success = true;
        } catch (PDOException $e) {
            error_log($e->getMessage());
            $errors[] = 'Could not save your details. That email may already be registered.';
        }
    }
}
?>
<?php foreach ($errors as $error): ?>
    <p style="colour:red;"><?= htmlspecialchars($error) ?></p>
<?php endforeach; ?>

<?php if ($success): ?>
    <p>User added successfully.</p>
<?php else: ?>
    <form method="post">
        <input type="hidden" name="csrf_token" value="<?= htmlspecialchars($_SESSION['csrf_token']) ?>">
        <input type="text" name="name" placeholder="Name" required>
        <input type="email" name="email" placeholder="Email" required>
        <button type="submit">Add User</button>
    </form>
<?php endif; ?>
Load http://localhost/form.php and submit it. Check phpMyAdmin – your new row should appear in the users table. The require at the top pulls in the same $pdo object built in Step 4, so this file never duplicates connection logic. The CSRF token is a random value stored in the session and echoed into a hidden field; on submission, hash_equals() confirms the posted token matches the session’s, which stops another site from silently submitting this form on a logged-in visitor’s behalf. filter_var(..., FILTER_VALIDATE_EMAIL) and the length check on $name reject obviously bad input before it ever reaches your query, and the catch block turns a duplicate-email database error into a message the visitor can actually act on instead of a raw stack trace.
Troubleshooting
“Connection failed: SQLSTATE[HY000] [1045] Access denied for user ‘root’@’localhost’” – your username or password in config.php doesn’t match your MySQL setup. On default XAMPP, username is root and password is blank; if you changed the MySQL root password at any point, update config.php to match.
“SQLSTATE[42S02]: Base table or view not found” – the users table doesn’t exist in the database PDO connected to. Re-run the CREATE TABLE statement from Step 4 against the exact database named in config.php, and double-check you’re not looking at a differently-named database in phpMyAdmin.
Blank white page with no error at all – PHP errors aren’t displaying, which is the default in most XAMPP installs once you’re past initial setup. Add ini_set('display_errors', 1); error_reporting(E_ALL); at the top of your script temporarily, reload, and read the actual error message before removing those two lines again.
Form submits but nothing happens in the database – check that your <form> tag has method="post", that your column names in the INSERT statement exactly match your table’s actual column names including case, and that $errors is empty – a failed CSRF or validation check will silently skip the insert and only show a message above the form.
“SQLSTATE[23000]: Integrity constraint violation … Duplicate entry” – you’re inserting an email that already exists, which the UNIQUE constraint from Step 4 is correctly rejecting. That’s expected behaviour, not a bug; the catch block in Step 6 turns it into a readable message instead of a crash.
Next steps
You now have the fundamentals: a working local environment, core syntax, a proper schema, and – critically – a form that validates, escapes, and protects itself against both SQL injection and CSRF. From here, the natural next step is a framework like Laravel, which handles routing, validation, and CSRF protection like the kind built by hand in Step 6 as built-in features rather than code you write yourself each time. See the Laravel 12 complete guide for beginners for that jump.
The habits from Steps 4 to 6 should follow you everywhere – they’re not PHP-specific tricks, they’re the baseline expectation for any developer writing production database code. If you’d rather have this built for you properly, get in touch and we’ll handle the development.
Frequently Asked Questions
Q: Is PHP still worth learning in 2026?
A: Yes. WordPress alone powers approximately 42% of all websites globally as of 2026 according to W3Techs, and WordPress runs on PHP, so PHP skills remain directly applicable to a huge share of the live web.
Q: What’s the difference between PDO and mysqli?
A: PDO supports multiple database types (MySQL, PostgreSQL, SQLite) through one consistent interface, while mysqli only works with MySQL – PDO is generally the better default for new projects.
Q: Why can’t I just open a .php file in my browser directly?
A: PHP is server-side, meaning the code must be processed by Apache before the browser sees anything. Opening the file directly (via file://) skips that processing entirely, so you either see raw code or a blank result.
Q: Do I need to know PHP 5 syntax before learning PHP 8?
A: No. PHP 8.x introduced union types, named arguments, enums, and a JIT compiler, and starting fresh with modern syntax avoids picking up outdated habits from older tutorials.
Q: Does PDO alone make my application secure?
A: No. Prepared statements stop SQL injection specifically, by keeping user-supplied values out of the SQL command structure. You still need output escaping (htmlspecialchars()) against cross-site scripting, CSRF tokens on forms that change data, and server-side validation – each closes a different gap, and none substitutes for the others.
Source: https://drs-web.co.uk/best-php-tutorial-the-complete-beginner-to-pro-guide-2026
This article was researched and written with AI assistance, then reviewed for accuracy and quality. Kev Parker uses AI tools to help produce content faster while maintaining editorial standards.
Need help with your web project?
From one-day launches to full-scale builds, DRS Web Development delivers modern, fast websites.